VanJS: Fullstack Rendering (SSR, CSR and Hydration)
Requires VanJS 1.2.0 or later, and Mini-Van 0.6.0 or later.
VanJS offers a seamless and framework-agnostic solution for fullstack rendering. We will provide a walkthrough for a sample application with SSR (server-side rendering), CSR (client-side rendering) and hydration. As an outline, here are the major steps we're going to take to build the sample application:
- Define common UI components that can be shared on both server-side and client-side.
- Implement server-side script with the help of Mini-Van for serving the HTML content to end users.
- Implement client-side script with the help of VanJS for adding client-side components and enabling hydration.
The sample application requires a bare minimum of dependencies. The server-side script can be run by Node.js. We can also build a fullstack application with other JavaScript runtime like Deno or Bun. Other front-end frameworks like Vite or Astro are not required, but it should be easy to integrate with them.
The source code of the sample application can be found here with the following directory structure:
hydration-example: Root of the sample application.src: Source files of the application.components: Common components that are shared on both server-side and client-side.hello.ts:Hellocomponent.counter.ts:Countercomponent.
server.ts: server-side script to serve the HTML content.client.ts: client-side script for client-side components and hydration.
dist: Bundled (and minified) client-side.jsfiles.package.json: Basic information of the application. Primarily, it defines the NPM dependencies.
You can preview the sample application via CodeSandbox.
A Bun-based variation of this example can be found here.
package-lock.json File
Dependencies are declared in package.json file:
  "dependencies": {
    "finalhandler": "^1.2.0",
    "mini-van-plate": "^0.6.3",
    "serve-static": "^1.15.0",
    "vanjs-core": "^1.6.1"
  }
- finalhandler and serve-static: Server-side packages for serving static files (primarily used for serving
.jsfiles). - mini-van-plate: The Mini-Van package used for SSR.
- vanjs-core: The VanJS package used for CSR.
Shared UI Components
Now, let's build some shared UI components that can run on both server-side and client-side.
Static Component
First, let's take a look at a static (non-reactive) component - Hello:
import { env } from "mini-van-plate/shared"

export default () => {
  const {a, div, li, p, ul} = env.van.tags

  const fromServer = typeof window === "undefined"
  return div(
    p(() => `👋Hello (from ${fromServer ? "server" : "client"})`),
    ul(
      li("🗺️World"),
      li(a({href: "https://vanjs.org/"}, "🍦VanJS")),
    ),
  )
}
Compared to the Hello component in the "VanJS by Example" page, there are following notable differences:
- We import the
envobject frommini-van-plate/shared. The purpose of theenvobject is to provide an abstractvanobject for shared components so that shared components don't have to depend on a concretevanobject. The client-side and server-side scripts are expected to provide the actualvanobject (from VanJS or Mini-Van, respectively) via functionregisterEnv, as shown later. - We can determine if the component is being rendered on the server-side or client-side:
and show different content based on it:const fromServer = typeof window === "undefined"
This will help us differentiate whether the component is rendered from server or from client.p(() => `👋Hello (from ${fromServer ? "server" : "client"})
Limitations: For the abstract van object, the typechecking for tag functions and van.add is quite limited. This is because it's hard to unify the type system across the common types between server-side and client-side.
Reactive Component
Next, let's take a look at a reactive component - Counter:
import { env, State } from "mini-van-plate/shared"

interface Props {
  readonly id?: string
  readonly init?: number
  readonly buttonStyle?: string | State<string>
}

export default ({id, init = 0, buttonStyle = "👍👎"}: Props) => {
  const {button, div} = env.van.tags

  const stateProto = Object.getPrototypeOf(env.van.state())

  const val = <T>(v: T | State<T>) =>
    Object.getPrototypeOf(v ?? 0) === stateProto ? (<State<T>>v).val : <T>v

  const [up, down] = [...val(buttonStyle)]
  const counter = env.van.state(init)
  return div({...(id ? {id} : {}), "data-counter": counter},
    "❤️ ", counter, " ",
    button({onclick: () => ++counter.val}, up),
    button({onclick: () => --counter.val}, down),
  )
}
Notable differences from the Counter component in the "VanJS by Example" page:
- Similar to the
Hellocomponent, it usesenv.vanimported frommini-van-plate/sharedto make the component environment-agnostic. - You can define states and bind states to DOM nodes as you normally do on the client-side. This is because in Mini-Van
0.4.0release, we adjusted its implementation to make it compatible to states and state-bindings related API, though with the absence of reactively (i.e.: changing a state won't lead to the update of the DOM tree), which is only possible on the client-side after hydration. - You can optionally specify the ID of the component with the
idproperty. This is helpful to locate the component while hydrating. - You can optionally specify the initial counter value (default:
0) with theinitproperty. - You can optionally specify the style of the increment/decrement buttons. As illustrated later, we will see how to make the button style of the
Countercomponent reactive to user selection. - We keep the
data-counterattribute of the component in sync with the current value of the counter. This will help us keep the counter value while hydrating.
Server-Side Script: HTML Template
Now, let's build the server-side script that enables SSR:
import { createServer } from "node:http"
import { parse } from "node:url"
import serveStatic from "serve-static"
import finalhandler from "finalhandler"
import van from "mini-van-plate/van-plate"
import { registerEnv } from "mini-van-plate/shared"
import Hello from "./components/hello.js"
import Counter from "./components/counter.js"

const {body, div, h1, h2, head, link, meta, option, p, script, select, title} = van.tags

const [env, port = 8080] = process.argv.slice(2);

const serveFile = serveStatic(".")

registerEnv({van})

createServer((req, res) => {
  if (req.url?.endsWith(".js")) return serveFile(req, res, finalhandler(req, res))
  const counterInit = Number(parse(req.url!, true).query["counter-init"] ?? 0)
  res.statusCode = 200
  res.setHeader('Content-Type', 'text/html; charset=utf-8')
  res.end(van.html(
    head(
      link({rel: "icon", href: "logo.svg"}),
      title("SSR and Hydration Example"),
      meta({name: "viewport", content: "width=device-width, initial-scale=1"}),
    ),
    body(
      script({type: "text/javascript", src: `dist/client.bundle${env === "dev" ? "" : ".min"}.js`, defer: true}),
      h1("Hello Components"),
      div({id: "hello-container"}, Hello()),
      h1("Counter Components"),
      div({id: "counter-container"},
        h2("Basic Counter"),
        Counter({id: "basic-counter", init: counterInit}),
        h2("Styled Counter"),
        p("Select the button style: ",
          select({id: "button-style", value: "👆👇"},
            option("👆👇"),
            option("👍👎"),
            option("🔼🔽"),
            option("⏫⏬"),
            option("📈📉"),
          ),
        ),
        Counter({id: "styled-counter", init: counterInit, buttonStyle: "👆👇"}),
      ),
    )
  ))
}).listen(Number(port), () => console.log(`Try visiting the server via http://localhost:${port}.
Also try http://localhost:${port}?counter-init=5 to set the initial value of the counters.`))
The script implements a basic HTTP server with the built-in node:http module (no web framework needed). You will probably first notice this line:
registerEnv({van})This is to tell all shared components to use the van object from this file, which is imported from the van-plate mode of Mini-Van.
Then for this line:
if (req.url?.endsWith(".js")) return serveFile(req, res, finalhandler(req, res))It tells the HTTP server to serve the file statically if any .js file is requested.
The bulk of the script is declaring the DOM structure of the page that is enclosed in van.html(...). As you can see, the expressiveness of tag functions enable us to declare the entire HTML page, including everything in the <head> section and <body> section.
The code declares an HTML page with one Hello component and two Counter components - one with the default button style, and the other whose button style can be selected by the user. Here are a few interesting things to note:
- The line:
indicates that we're choosing different JavaScript bundle files under different modes:script({type: "text/javascript", src: `dist/client.bundle${env === "dev" ? "" : ".min"}.js`, defer: true})client.bundle.jsin dev mode whereasclient.bundle.min.jsin prod mode. It makes sense to use original client-side script during development and use the minified script in production. - We're allowing users to set the initial value of the counters via query parameters. Specifically, the line:
and line:const counterInit = Number(parse(req.url!, true).query["counter-init"] ?? 0)
enable that.Counter({van, id: "basic-counter", init: counterInit}) - We're choosing
van-platemode as SSR is done with pure text templating without any DOM manipulation. If you want some DOM manipulation for your SSR, you can choosemini-vanmode instead.
Client-Side Script: CSR and Hydration
The final step is to complete the client-side script file.
Registering the van Object
First, let's register the van object from VanJS so that it can be used by all shared components.
registerEnv({van})Client-Side Component
Then, let's add a client-side component:
van.add(document.getElementById("hello-container")!, Hello())This will append a CSR Hello component right after the SSR Hello component. You can tell whether the component is rendered on the server-side or on the client-side by checking whether the text is 👋Hello (from server) or 👋Hello (from client).
Hydration
Next, let's hydrate the counter components rendered on the server side to add the reactivity. We can use van.hydrate to achieve that:
van.hydrate(document.getElementById("basic-counter")!, dom => Counter({
  id: dom.id,
  init: Number(dom.getAttribute("data-counter")),
}))
van.hydrate replaces the SSR component (located by document.getElementById("basic-counter")!) with the CSR Counter component. Note that the 2nd argument of van.hydrate is the hydration function that takes the existing DOM node as its parameter and returns the new hydrated component. This way we can get the current state of SSR component (via Number(dom.getAttribute("data-counter"))) and pass-in the information while constructing the hydrated component, which keeps the counter value the same after hydration.
In the hydration function, you can read the val property of external states. In this way, the hydrated component will be a State-derived node, i.e.: a DOM node that will be updated whenever its dependency states change. Now, with that, let's build a Counter component whose button style can be adjusted by end users. First, let's define a state buttonStyle whose val is bound to the value of the #button-style <select> element:
const styleSelectDom = <HTMLSelectElement>document.getElementById("button-style")
const buttonStyle = van.state(styleSelectDom.value)
styleSelectDom.oninput = e => buttonStyle.val = (<HTMLSelectElement>e.target).value
Next, let's make the hydrated Counter component reactive to buttonStyle state:
van.hydrate(document.getElementById("styled-counter")!, dom => Counter({
  van,
  id: dom.id,
  init: Number(dom.getAttribute("data-counter")),
  buttonStyle,
}))
Since buttonStyle is passed into the Counter component where its val property is referenced, the hydrated Counter component will be reactive to the change of buttonStyle state.
Note that, this is an illustrative example to show how to make the entire hydrated component reactive to external states. In practice, the implementation of Counter component can be optimized to only make the <button>s' child text nodes of the Counter component reactive to buttonStyle state. This can be achieved by binding more localized DOM nodes (i.e.: the child text nodes of <button>s) to the buttonStyle state. You can check out the implementation below for an optimized Counter component:
import { env, State } from "mini-van-plate/shared"

interface Props {
  readonly id?: string
  readonly init?: number
  readonly buttonStyle?: string | State<string>
}

export default ({id, init = 0, buttonStyle = "👍👎"}: Props) => {
  const {button, div} = env.van.tags

  const stateProto = Object.getPrototypeOf(env.van.state())

  const val = <T>(v: T | State<T>) =>
    Object.getPrototypeOf(v ?? 0) === stateProto ? (<State<T>>v).val : <T>v

  const counter = env.van.state(init)
  return div({...(id ? {id} : {}), "data-counter": counter},
    "❤️ ", counter, " ",
    button({onclick: () => ++counter.val}, () => [...val(buttonStyle)][0]),
    button({onclick: () => --counter.val}, () => [...val(buttonStyle)][1]),
  )
}
API reference: van.hydrate
| Signature | van.hydrate(dom, f) => undefined |
| Description | Hydrates the SSR component dom with the hydration function f. |
| Parameters |
|
| Returns | undefined |
Demo
Now, let's check out what we have built so far. You can preview the application via CodeSandbox. Alternatively, you can build and deploy application locally by following the steps below:
- Clone the GitHub repo:
git clone https://github.com/vanjs-org/vanjs-org.github.io.git - Go to the directory for the demo:
cd vanjs-org.github.io/hydration-example - Install NPM packages:
npm install - Launch the development server:
You will see something like this in the terminal:npm run devTry visiting the server via http://localhost:8080. Also try http://localhost:8080?counter-init=5 to set the initial value of the counter. - By clicking the links printed in the terminal, you will go to the demo page.
- You can build the bundle for production with:
npm run build
Let's go to the demo page now. You will probably first notice the Hello components of the demo:
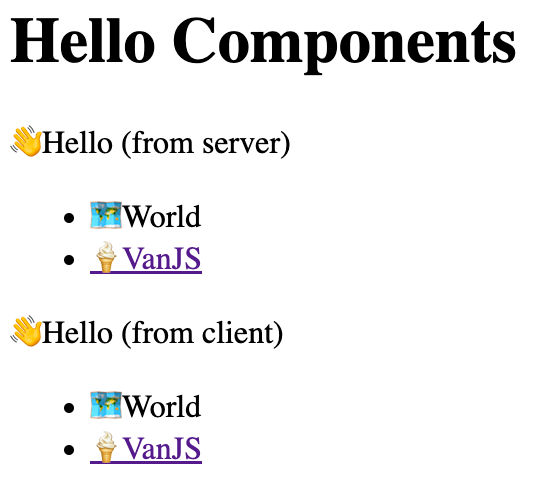
You can see an SSR Hello component followed by a CSR Hello component.
The second part of the demo page is for hydrating the Counter components. In real-world use cases, hydration typically happens immediately after the page load, or when the application is idle. But if we do that in our sample application, hydration will happen so fast that we won't even be able to notice how hydration happens. Thus, for illustration purpose, we introduce a <button> where hydration only happens upon user click:
van.add(document.getElementById("counter-container")!, p(button({onclick: hydrate}, "Hydrate")))As a result, the second part of the demo will look like this:
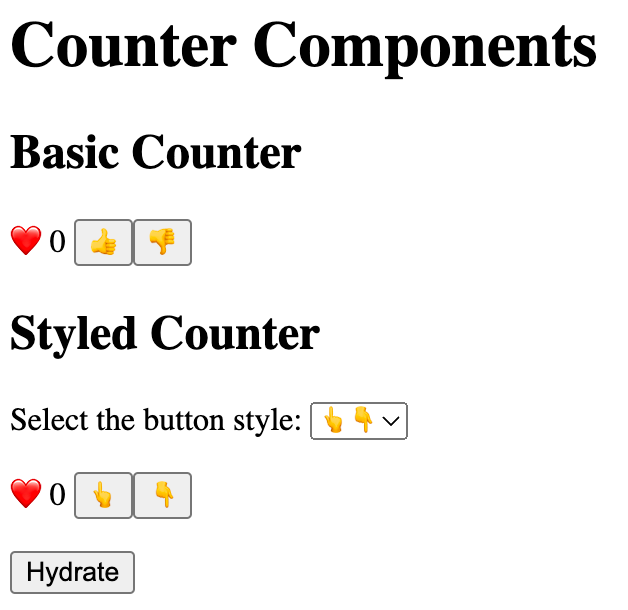
You can verified that all the Counter components are non-reactive before the Hydrate button is clicked and can be turned reactive upon clicking the Hydrate button.
Fullstack Rendering for VanX
Fullstack rendering for VanX-based UI components is also supported. To enable this, env in mini-van-plate/shared provides an abstract vanX object as well, and you can register the concrete vanX object via registerEnv in the client-side and server-side scripts. In addition, mini-van-plate/shared provides a dummyVanX object which allows you to register vanX on the server-side.
A sample application (a VanX-based TODO list) can be found here (preview via CodeSandbox).
The End
🎉 Congratulations! You have completed the walkthrough for fullstack rendering. With the knowledge you have learned, you will be able to build sophisticated applications that take advantage of SSR, CSR and hydration.